Sunday, 24 May 2009

Checkpoint to Cisco VPNs #1

Article #1 - Intro & Cisco Setup.

To show some of the finer points of Checkpoint VPNs I'll rig up a test lab with a site-to-site VPN linking a Cisco IOS router and a Checkpoint R65 splat box.

This article is not intended to be a general VPN introduction, rather the specifics of Checkpoint/Cisco interaction.


The network will look like this:
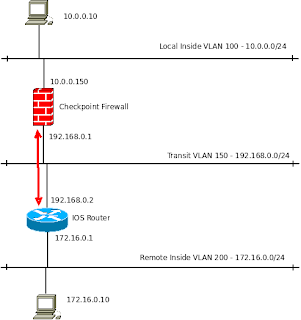


The local end is using 10.0.0.0/24, the Smart Center sits in this subnet.

The VPN traffic is shown by the red arrow. I'm using a transit network, VLAN 150 - 192.168.0.0/24 but this will probably be the internet in most cases.

The first VPN is going to be very simple, no NAT involved anywhere.


Cisco IOS Setup

In this case we need a static route configured on the IOS router to ensure traffic for the remote LAN goes out of the correct interface:
ip route 10.0.0.0 255.255.255.0 192.168.0.2
In reality you may not need this as for internet-based site-to-site VPNs the routers default route often does the job.

Now the five steps to create a VPN, handy bit of ISCW revision!
  1. Define the ISAKMP (phase 1) policy.
  2. Define the IPsec (phase 2) policy.
  3. Create the crypto ACL specifying interesting traffic.
  4. Make the crypto map to bind it all together.
  5. Apply the crypto map to an interface.

1 - ISAKMP policy

crypto isakmp policy 10
encr aes 256
hash sha
authentication pre-share
group 2
crypto isakmp key cisco address 192.168.0.1

2 - IPsec policy
crypto ipsec transform-set TESTSET esp-aes 256 esp-sha-hmac

3 - Crypto ACL
Define here what traffic should be encrypted.
ip access-list extended VPN_INTERESTING_TRAFFIC
permit ip 172.16.0.0 0.0.0.255 10.0.0.0 0.0.0.255 log

4 - Crypto Map.

 crypto map VPN_MAP 10 ipsec-isakmp
set peer 192.168.0.1
set transform-set TESTSET
set pfs group2
match address VPN_INTERESTING_TRAFFIC


5 - Apply to an interface

Cisco_Router(config)#interface fastethernet 0/0
Cisco_Router(config-if)#crypto map VPN_MAP
*Mar 1 00:25:33.187: %CRYPTO-6-ISAKMP_ON_OFF: ISAKMP is ON


If you see the "ISAKMP is ON" message then it's looking good. If you get errors then check whether your hardware and software is supported, as an example some of the 8xx series routers cannot do AES encryption and I don't think IPsec is supported on any of the standard IOS images.

Part 2 goes over configuration of the Checkpoint end.

Read more...

Tuesday, 19 May 2009

BDPU Guard Vs Filter

Spanning-tree BPDU Guard or BPDU Filter?

A question that has cropped up on more than one occasion is which of these options should be used? BPDU Guard or BPDU filter?

You may think it safest to use both, however that isn't the case.


BPDU Guard
The port is error disabled when a BPDU is received.

BPDU Filter
If the port receives BPDUs then portfast is disabled and it functions as a normal STP port.


You may think that BPDU filter is the more useful setting as it always results in a functioning port, however consider two switches connected together to form a bridging loop as shown here.

With BPDU guard configured on all four ports, the BPDUs are detected and ports are shut down.

With BPDU filter configured on all four ports, no BPDUs are transmitted. The switches are not aware of each other and happily forward traffic down all links, creating a bridging loop.

With both options enabled the same thing happens.

The important difference is that BPDU filter prevents transmission of BPDUs.

If you're looking at standard switchport setting then this is not desirable, so the configuration of choice is:

spanning-tree portfast
spanning-tree bpduguard enable


Read more...

Secure Switchport Template

There are several reasons why you might want to use a switch port template.
  • Make life easier for administrators.
  • Standardize configuration.
  • Allow people without specific Cisco knowledge to configure ports.
  • Increase security.

An example template in macro form:


macro name accessport
switchport mode access
switchport nonegotiate
switchport access vlan 99
no cdp enable
spanning-tree portfast
spanning-tree bpduguard enable
storm-control multicast level 20.00
storm-control broadcast level 20.00
@


To apply this to a port run:

configure terminal
interface fa0/xx
macro apply accessport


It is probably advisable to reset the port configuration in advance in which case the commands become:

configure terminal
default interface fa0/xx
interface fa0/xx
macro apply accessport


So what do these commands do?

switchport mode access
Specify the port is an access port.
switchport nonegotiate
Disable Dynamic Trunking Protocol (DTP).
switchport access vlan 99
Set the port into a VLAN to avoid VLAN hopping shenanigens. Replace VLAN 99 with the ID of an unused VLAN on your network (not VLAN 1!).
no cdp enable
Disable CDP to stop attackers flooding the CDP neighbor table using Yersinia or similar tools.
spanning-tree portfast
Turn on portfast for access ports, usually a good idea. If you use boot-from-LAN then you'll need this!
Note that turning on portfast does NOT disable STP on that port, it just allows the port to go directly to the forwarding state. You could still create a temporary bridging loop however so also apply:
spanning-tree bpduguard enable


Turn on BPDU Guard to shut the port down if it gets connected to another switch, but allow this switch to keep sending BPDUs on that port.

You can turn this on globally with the command:
spanning-tree portfast bpduguard default


storm-control multicast level 20.00
storm-control broadcast level 20.00

Configure storm-control.


Further reading:

The NSA guide to Cisco switch security.

Read more...

Storm Control


Storm-control
is a very useful command for all switch-ports which allows you to set limits for Broadcast and Multicast traffic. When those limits are exceeded, traffic of that type is blocked on the interface until the storm has passed.

The configuration for the storm control level as a percentage of the link size is:
storm-control {broadcast|multicast} level {level} [level-low]


You can also set the action to take, either to filter the traffic or just to send an SNMP trap. The default action is to filter traffic and not send a trap.
storm-control action {shutdown|trap}


There are a couple of reasons why you may encounter large amounts of multicast or broadcast traffic on a LAN:
  1. There are lots of Multicast/Broadcast applications
  2. There is a bridging loop
  3. A device is malfunctioning and spamming the network


Some traffic monitoring is needed to check how much multicast/broadcast is normal on the network before configuring storm-control. You should also allow a reasonable amount of contingency so that ports don't start getting blocked if the CEO decides to multicast his video diary out to the company!

So why is it useful?

The major advantage to storm control is in the situation of a bridging loop. Typically it will be broadcast and multicast traffic that takes the network down as it gets perpetually forwarded.

With storm control the damage is limited, hopefully enough to allow LAN access to continue with reduced performance. It may not keep the users happy but it should allow you to remotely troubleshoot the network.

Without it you may be looking at a major outage lasting days while you walk around the site with a laptop trying to find the source of the failure.


Warning

Be careful setting the level-low (falling threshold) value. If this is set too low then you may find that storm-control blocks a port and never unblocks it. The following config looks innocent enough:
storm-control multicast level 20.00 0.00

It tells storm control to block the port if multicast traffic exceeds 20% of the total link size which seems perfectly reasonable.

The second option tells storm control to un-block the port when multicast traffic falls below 0% of the link size. Depending on your network this may never happen so the port will remain permanently blocked until someone runs shut/no shut on it.

Read more...