Showing posts with label security. Show all posts

Thursday, 20 May 2021

GDPR and Appropriate Security Controls

GDPR article 32 requires "appropriate" controls to protect personal data, but what exactly is appropriate? The ICO has published various cases that can be used to gauge their expectations.

Having a risk assessment helps to qualify the approach and show due dilligence, but it's a subjective process so results will vary and if the ICO disagree with the outcome then the financial penalties can be large. Marriot claimed a risk based approach supported their decision to focus database monitoring and encryption on card holder data, however the ICO disagreed with that conclusion and held them liable for not giving personal data the same level of protection.

Industry regulations such as PCI can help indicate that controls are "appropriate".

Conclusion

The ICO appear to take the state of the art as their baseline and seem to have a fairly idealistic view on implementing enterprise security. They look at recommendations from bodies such as NCSC, NIST, etc alongside industry regulations and consider any deviation from those as an indicator of negligence which increases the liability. Sensible efforts will be considered such as Marriot's MFA implementation, which ultimately turned out to be incomplete but that was not considered in the judgement as an independent audit had informed them the control was in place.

A few particular controls were called out in multiple cases and should be on any organisations radar:
  • Application Whitelisting.
  • Multi-factor authentication.
  • Detection of configuration change.
  • Privileged access management (PAM) and implementation of least privilege.
  • Risk Assessment of personal data storage and processing.
  • Awareness of good practice and current issues with technologies in use.
  • Strict control over remote access.
  • Compliance with internal security policies and relevant industry regluation.
Network segregation was also discussed in some cases, but highlighting that segregating the IP network is not the whole story if the same Active Directory is permitted to all network areas. This is an important consideration for organisations who may be implementing segregation, particularly post the Maersk NotPetya incident.

In terms of specific items called out with some big cases that indicate expectations of controls are:

Ticketmaster

https://ico.org.uk/media/action-weve-taken/2618609/ticketmaster-uk-limited-mpn.pdf
  • Hacked via 3rd party Javascript chat bot they'd included on their website, 3rd party was then compromised.
  • The 3rd party had ISO27001, this was not considered relevant by the ICO as it's not a software security standard.
  • The ICO used blog posts and Stackoverflow questions about risks from including 3rd party Javascript on website as evidence that this was a recognised issue, combined with supply chain articles by NIST and NCSC.

BA

https://ico.org.uk/media/action-weve-taken/mpns/2618421/ba-penalty-20201016.pdf
  • Referenced CPNI GPG from April 2015 supply chain guidance on assessing risk
  • Mentioned various NCSC and NIST documents recommending MFA
  • Highlighted that BA's own internal policy mandated use of MFA.
  • However their implementation of Citrix did not apply MFA to all access.
This highlights the need to test the implementation of security controls to ensure they are working and effective, or at least audit their configuration.
  • Did not have a risk assessment of the Citrix solution or the applications accessed through it.
  • Had not locked down the services available by Citrix.
  • Lack of app whitelisting.
  • Lack of server hardening.
  • Limited restrictions on apps being opened by stopping clicking the icon, but still able to run via file->open.
  • Environment was pen tested, but scope appears to have been limited so many issues were not detected.
  • Called out use of hardcoded passwords.
  • Suggested logging access to certain files containing hardcoded passwords would be a suitable control.
  • Lack of implementation of "least privilege" principles.
  • Lack of monitoring of unexpected (e.g. guest) account logins.
  • No use of PAM.
  • Limited monitoring.
  • Used PCI DSS but were not compliant with it.
  • Left debug logging in place on live systems, increasing data available to attackers.
  • Lack of File Integrity Monitoring (FIM).
  • No ability to detect changes to the website code.

Marriot

https://ico.org.uk/media/action-weve-taken/mpns/2616891/dsg-mpn-20200107.pdf
Marriot thought MFA was implemented and had even audited it, but there were undiscovered gaps. The ICO accepted this and did not include that in their assessment.

  • Insufficient monitoring of privileged accounts - not logging access to systems, noting from other cases that logging alone is of little value unless someone is checking the logs or being alerted.
  • Insufficient monitoring of databases - Guardium deployed but only on cardholder storing tables, so they had done a risk based approach to choose where to monitor, but was not deemed adequate by the ICO. SOC/SIEM was not logging the user access to databases. Boundary controls were not enough without internal monitoring.
  • Control of critical systems - app whitelisting, monitoring/alerting.
  • Encryption - no justification/risk assessment of data held without encryption.

DSG

https://ico.org.uk/media/action-weve-taken/mpns/2616891/dsg-mpn-20200107.pdf
  • It was deemed that that PAN (Primary Account Number - i.e. Card data) does constitute personal data, so be wary of this as data is considered PII if people can be indirectly identified by it, phone numbers being a common example that many may not initially consider as being PII. See: https://www.gdpreu.org/the-regulation/key-concepts/personal-data/
  • PCI DSS is not indicative of appropriate security for PII but certifications like this can be helpful in deeming what level is considered appropriate, it sounds like DSG had some issues with PCI compliance.
  • Segregation was considered as both network/IP and Active Directory, the inference being that segregating your network but not your AD is probably not appropriate.
  • Not having host based firewall was called out, despite that it wouldn't have prevented this attack. Also the ability to detect changes to the configuration of these local firewalls was called out as a requirement.
  • Inadequate patching on domain controllers.
  • No logging/monitoring in place to detect and respond to attacks.
  • Outdated versions of Java.
  • Not strictly controlling privileged access rights - i.e. no PAM.
  • Not using standard builds with hardening built in.
  • Patching of devices was not compliant with their own policy.
  • Case notes state that application whitelisting is considered "appropriate" control

Read more...

Wednesday, 17 August 2011

Cisco ASA 8.4 - Global Access Lists

Handy new feature in version 8.4 of the ASA software is the ability to do global access lists.


The Cisco ASA allows security levels to be applied to interfaces, traffic is automatically allowed from a high to low security level interface but not vice versa. It's probably designed for the fairly common use case of a perimeter device between a LAN and the internet. The internet link is set to security level 0 and the inside interface to 100. All LAN traffic is then allowed to flow out. This is shown below:


Prior to version 8.3, access lists (ACLs) had to be applied on an interface and in a direction, e.g.

access-list MYACL extended permit tcp any any eq www
access-group MYACL in interface outside
As soon as an ACL is applied to an interface, it will pass traffic based on the ACL rather than based on security levels. However it gets complicated as traffic coming in another interface that would previously have been allowed is now still allowed, in the example above if you permitted port 80 in from the internet, all outgoing LAN traffic is still allowed.


Now in version 8.4, Cisco have added the ability to have a single global ACL that applies to all traffic regardless of which interface it uses. This is how most other firewalls work so a welcome change. To do this you create the ACL then apply it with:

access-list MYACL extended permit tcp any any eq www
access-group MYACL global

When a global ACL is applied, it removes all behaviours based on security levels from ALL interfaces. So in the original example, you would need a rule in your global ACL that permits LAN hosts access to the internet. The any/any rule is a good example of what not to do as this now globally means "any address" rather than specific to any particular interface.

Update 2015 It appears that not quite "ALL" security level behaviours are removed, you still need the same-security-level command to allow traffic to flow between interfaces regardless of ACL.


Read more...

Wednesday, 13 April 2011

Evaluation Assurance Levels - EAL

EAL stands for evaluation assurance level and is a certificate of security for IT products measured against a set of common security criteria. The main source of information on EAL levels is the common criteria portal where you can find details of approved products and information on the criteria used for the EAL certifications.

Who uses it?


Your average network bod may not come across EAL very often. It tends to crop up in areas that are regulated by government bodies such as CESG who will often require EAL4 certified products for certain secure environments. However you don't just buy EAL4 kit and be government approved, it fits into a much larger security framework such as ISO27k dealing with everything from who gets into the building to how you manage changes to IT systems.

How does a product get EAL certified?


It is assessed against a set of common criteria by an approved agency. The developer of the system produces a security target (ST) document containing a list of features to be assessed.The ST is based on the criteria here. The process is long and expensive, according to wikipedia vendors were spending $1 - $2.5million to gain EAL4 certification in the 1990s.


What do you get when EAL certified?


Certified products are listed on the common criteria portal along with the rating granted, the ST it was assessed against and the assessment report. e.g. here (PDF) is the ST for the Cisco ASA as a firewall and here (PDF) is the assessment report. Interesting to note that the EAL4 VPN certificate was issued separately, so an ASA acting as both firewall and VPN endpoint is not a valid EAL4 solution, strictly speaking you would need two in series performing each task.

So what does it mean in to a network engineer?


Probably not a lot, it's a policy requirement for many places but the assessment is only against the device, not against the specific implementation of it. You could deploy an EAL4 firewall with a policy of "permit any any" and it's still an EAL4 device! At that point the other security mechanisms should have stopped you from putting it on the network.

If you are involved in hardware selection for a regulated organization then you may need to use EAL4 devices in certain situations.

What is required to meet the various levels?


The EAL process is broken down to cover the following aspects of a system:
Development, documentation, life-cycle support, security target evaluation, testing, vulnerability assessment.

Each EAL level goes into slightly more detail, for example the "development" area at EAL1 requires a basic functional specification to be provided by the developer. EAL2 requires that same functional specification but expanded to include details of security inforcement. It also requires a security architecture description and a basic design. The specifics of those items are detailed here.

How long does it take to get EAL4?


It seems to vary from a very long time to aeons, certainly it's measured in years rather than months. A look on the NIAP CCEVS evaluation and evaluated list for firewalls shows a few examples:
Checkpoint R65 HFA01 on IPSO recorded as submitted Oct 2005 although R65 was released in 2007 so the process was started early during development. It passed March 2009. So that's 4 years to get certified and the product went EOL in March 2011, 2 years later.
Cisco ASA 8.3 as a VPN submitted November 2009 still not passed, predicted June 2011.
Palo Alto submitted various devices in December 2009 and still running.

What exactly is certified?


The certification is issued against a specific software release and hardware platform.

A specific version of the software you say? As in....minor version??


That is how the cert is written. The Cisco ASA obtained EAL4 for firewall purposes on version 7.0(6) of it's OS which was released in August 2006. Cisco have been patching and updating that for 5 years! The ASA is now up to release 8.4, which has been submitted again to CCEVS (scheme run by NIST and NSA) for evaluation.

In reality there will be a security assessor on the ground who will review the solution and hopefully be sensible about using a modern patched version of the OS and judge it acceptable to meet an EAL4 requirement, even if it's not strictly what's on the EAL4 certificate.

I don't know anyone who would tell you with a straight face that using a 5 year old OS on a firewall is going to increase your security!

What about high end firewalls?


There is a bit of a gap, if you need an EAL4 firewall with 10gig throughput then you're out of luck as the only one that's passed assessment is Checkpoint Power-1 on the 5075/9075, however that went end of life last month (March 2011). The closest is the Cisco 5580 which has been submitted for EAL4, due November 2011 and is arguably similar enough to the 5540 to be acceptable, however it's recently announced as being binned in preference of the 5585 so after August 2011 you can't buy one any more!

The security market moves quickly compared to the EAL assessments and it proves tricky.

The top end Cisco firewall platform is the 5585, not even showing as submitted for EAL evaluation yet.
Checkpoint has R71 under assessment now, predicted result in November 2011.
Palo Alto has various items aiming for November 2011, but their flagship model the PA-5000 is not listed as under assessment, it only recently hit market in the UK so EAL certification may not have been discussed yet.
Juniper have EAL4 for their ScreenOS platform the SSG, which goes EOL in 2013. They have EAL3 for Junos 9.3 on the SRX platform, the current version is 10.4. There doesn't appear to be any indication that the SRX security platforms have been submitted for EAL4 certification, although it would be surprising if that were the case as governments would be ditching Juniper en-masse before 2013.

So until November 2011 there are no EAL4 10gig firewalls. You'll have to build a farm of 1gig ones instead!

What alternative schemes are there?


FIPS-140 from NIST.
CAPS, the CESG Approved Product Scheme.

Is it worth me buying EAL4 products?


If you have to ask then probably not. If your business is regulated and the agencies setting those policies define EAL4 as a requirement then you have no choice.

For companies with the option I would say it's a helpful indicator but I would certainly use other aspects above the EAL status when selecting a device:

  • Performance.

  • Price.

  • Published security tests and exploits.

  • Staff familiarity.

  • Internal testing.


An EAL4 certificate does indicate that the product was developed following good practices and has a well defined and documented architecture. These are clearly good things in terms of stability and security. However not having EAL4 doesn't necessarily mean the product hasn't followed a good development process and isn't secure, it just means the manufacturer hasn't paid for it to be assessed.

Read more...

Tuesday, 21 December 2010

Zone Based Firewall & Port Forwarding

This article covers setting up port forwarding with Cisco Zone Based Firewall (ZBF) on a typical home connection.

There are a couple of steps:
1 - Give your LAN host a static IP.
2 - Set up NAT to handle the port forwarding
3 - Set up ZBF rules to allow the traffic


1 - Static IP


You can either manually configure the client or use a DHCP reserved address.

DHCP reservation is a royal pain on the Cisco 800 series, make sure there are no existing bindings when you try to configure it (show ip dhcp bindings), the basic configuration is:

ip dhcp pool MATT_PC
host 192.168.0.10 255.255.255.0
client-identifier 01aa.aabb.bbcc.cc
client-name Matt-PC


The client-identifier is the VLAN ID prepended to the MAC address. If that fails then you can try using "hardware-address aaaa.bbbb.cccc", strangely for my dual boot system Linux only picks up the reserved address using hardware-address config and Windows 7 only works using the client-identifier option. Use whatever works!


2 - NAT forwarding


You need several bits of information, the name of the external interface, the static IP used internally, the port and protocol (TCP/UDP) that you wish to forward. The format is:

ip nat inside source static <protocol> <LAN-IP> <port> interface <external-interface> <port>


e.g. a DSL router using Dialer0 interface to forward UDP traffic on port 88 to 192.168.0.10 is:
ip nat inside source static udp 88 192.168.0.10 interface dialer0 88


3 - Set up ZBF rules to allow the traffic


This is the actual Zone Based bit. You'll need to understand the setup to tweak it, no simple guides I'm afraid.

You need to know the name of your zones, I'm using the default setup which has called the outside/internet "out-zone" and internal/LAN "in-zone". It will show up in the interface configuration under the "zone-member security XXXX" option (e.g. found with "show run interface dialer0")

You basically make a policy, then apply that policy to traffic going between two zones.

You can use CBAC with the "inspect " command but in this case I'll use an access-list instead. ACL may be your only choice if the protocol you are forwarding is not one supported by CBAC. In this case it's Xbox-live or Games for Windows so one port may be kerberos (88) but the other is not known so an ACL is used. The steps are:


3a) Set up the ACL


I'm doing XBL so I need UDP/88, UDP/3074 and TCP/3074:
ip access-list extended GFW_Incoming
permit udp any host 192.168.0.10 eq 88
permit tcp any host 192.168.0.10 eq 3074
permit udp any host 192.168.0.10 eq 3074


3b) Set up a class-map to match the ACL


class-map type inspect match-any Incoming-Traffic
match access-group name GFW_Incoming


3c) Create a policy saying what to do to the traffic


policy-map type inspect incoming-policy
class type inspect Incoming-Traffic
pass
class class-default
drop

Note that "pass" means let it through. Inspect means run CBAC on it, but it must be a recognised protocol. "Drop" should be clear enough, you could include "drop log" but it will never log anything (see note * at end).


3d) Tell ZBF where the policy applies, specifically between which zones.


zone-pair security Outside-to-Inside source out-zone destination in-zone
service-policy type inspect incoming-policy


And that should be it!

To help troubleshoot, you can do show ip access-list GFW_Incoming and see if any packets are being matched.


Final note - why drop log doesn't log anything in this case.
ZBF creates a firewall policy for traffic going between two zones. In this case our policy is for traffic going between the out-zone (WAN) and the in-zone (LAN). The traffic is "routed" between those zones by the NAT rules doing the actual port forwarding.

Traffic that comes from the internet (out-zone) and hits the firewall without triggering a NAT rule is not going anywhere near the in-zone. The relevant policy would be out-zone to self-zone (the router itself).

So the only time our out-zone to in-zone policy can ever drop traffic is if the NAT rules are forwarding but our policy does not match (the ACL in this example), i.e. if it's configured wrong! If you want to log dropped traffic then you need to specify a policy for out-zone to self-zone and use logging on that.


Read more...

Thursday, 18 March 2010

Generate Strong Passwords from a Unix Box

Works from any form of unix that has a /dev/urandom and has uuencode installed.


head -n 2 /dev/urandom | uuencode -m -


Read more...

Wednesday, 17 February 2010

Creating a CRL for an OSX keychain CA

OSX has a handy keychain utility that can be used to create a CA among other things. I needed a CRL generated for my keychain-created CA in order to use certificate-based VPNs on a Netscreen box.


There are probably 101 ways of doing this, mine is:

Make a CA structure as per /opt/local/etc/openssl/openssl.cnf
(or alternately you could provide the suitable CLI options to openssl each time)


mkdir -p demoCA/private
echo 01 > demoCA/serial
echo 01 > demoCA/crlnumber


Locate your CA private key in the keychain utility, right click and export. This saves it as pkcs12 format.

Convert it to PEM format with:
openssl pkcs12 -nocerts -in My_Macbook_CA.p12 -out demoCA/private/cakey.pem


Edit it and delete the text above:
-----BEGIN RSA PRIVATE KEY-----


(this last step probably isn't necessary)

Export the CA certificate from keychain and change the format to PEM.

Then you can generate the CRL with:
openssl ca -gencrl -out crl.pem -cert exported_cert.pem


If you get any errors then check the paths, the default openssl config puts this in ./demoCA

Note that this creates a CRL valid for 30 days only with the default openssl.cnf, you probably want to increase this by editing /opt/local/etc/openssl/openssl.cnf and changing the default_crl_days value.


Read more...

Sunday, 3 January 2010

DSL Firewalls and PPP Half Bridges

A PPP Half Bridge lets you extend the public IP address of your network into the LAN. This is useful if you have a firewall that doesn't have it's own DSL modem and want to do VPNs.

It's also known as DHCP spoofing.


Half bridging is a hack where your DSL modem makes the PPPoA connection to your ISP and is issued a public address, then advertises that same IP back on the LAN with a very short DHCP lease time. It then goes into bridging mode and forwards all traffic to the LAN host. The LAN host is effectively directly connected to the internet.

This is useful if you want to avoid NAT for any reason, e.g. to terminate VPNs.

The topology is shown below:


There's a big cost benefit to connect a firewall device to the DSL connection without requiring a built-in DSL modem.

Cisco's firewall line is the ASA which has no DSL module available so the only option is to use an external ADSL router. The low-end box is the 5505 which can be picked up from around £250 depending what software license you want.
They also have the 857W (~£300) and 877W for around £400 which include both wireless, VPN capability and DSL ports. However these are routers, not firewalls. They may be able to run the IOS firewall software but the performance of that is not likely to be great.

Juniper used to make a 5GT-ADSL with wireless that did the job nicely, but has now been replaced by the SSG 5 at around £650 with wireless but no DSL modem available. The only all-in-one option is to buy an SSG 20 (~£800) and an ADSL expansion card (~£500). The 5GT are still available from ebay for around £2-300 if you don't mind no support.

The home-brew solutions such as pfsense, Smoothwall and IPCop will also benefit from using the half-bridge option. Run it on something like a PC Engines mini system which cost under £100 and you'd have a very powerful little box.


Compatible Modems
Not all ADSL routers support half bridging, it's probably fair to assume that most don't. I use an old Origo 8400 which aren't available any more, I think that company is now called Safecom and they do pop up on ebuyer as the value range from time to time.

The Zyxel P-660R-D1 supports half bridging and is available from around £25 online.

According to certain forums the Linksys AM200 supports it as does the Netgear DG834G (but not GT). Some Draytek models also support it.

Read more...

Sunday, 29 November 2009

PPPoA Password Retrieval on Netgear DG834

I wanted to install a new firewall on my home DSL connection recently, nothing against the Netgear as it works great, but I had a Juniper box that I wanted to try out. The UK uses PPPoA for home DSL connections so you need a username and password to get onto the network.


The DG834 has a web interface for management, Netgear's own FAQ has help with retrieving that password if you've lost it. Once on there, you can get the basic settings which looks as follows:


The password is starred out.

It's hidden using an HTML password field, which is meant to stop someone looking over your shoulder from seeing what password you type. However that is all it aims to protect against, it's then down to the individual web application as to whether it actually strips the password from the source code...and this Netgear doesn't.

You can use your browsers "view source" option (or "this frame" -> "view source") to read the PPPoA login from the HTML code:


Read more...

Friday, 23 October 2009

ASA Site-to-Site VPN Using Certificates from OpenSSL

To provide increased security over pre-shared keys you can authenticate VPN endpoints using certificates. Ideally this would be using a full PKI solution but a simpler method is available if you don't need revocation.

This guide is for the Cisco ASA. As with most things it's a doddle in the ASDM because you can take full advantage of the GUI and be prompted for each step, however I'll show the CLI commands.


I'll use OpenSSL as a CA, following on from the previous article. There is a Cisco guide for using Microsofts CA (search for "asa site-to-site vpn certificate microsoft" if the link dies), but OpenSSL works just as well. This guide pretty much mirrors the Microsoft one above except for the editing of certificates and OpenSSL commands used to sign the certs.

The ASA can run it's own CA, however it seems aimed squarely at supporting remote user VPNs, it doesn't support signing CSRs and the user certificates it outputs are passcode protected so not usable by another ASA in a site-to-site VPN. If Cisco include that functionality it'd be very useful, if they add SCEP features to allow enrollment of devices then it'll be very handy indeed.


The procedure is:
  1. Install the CA public key onto the ASA.
  2. Generate a Certificate Signing Request (CSR) on the ASA.
  3. Sign the CSR using the CA.
  4. Install the signed certificate onto the ASA.
  5. Configure the VPN.


1. Install the CA public key onto the ASA


If you've followed the directions from the previous article then the public key is called cacert.pem, open this file in a text editor (wordpad rather than notepad if using Windows). On the ASA configure a CA trust point for terminal enrollment (pasting the key into the terminal), the authenticate command will then prompt you to paste the key:
crypto ca trustpoint Test_CA
enrollment terminal

crypto ca authenticate Test_CA
* At this point you'll be prompted to paste the CA public key (from cacert.pem) *


That's it, the ASA will now trust keys signed by your CA.

2. Generate a Certificate Signing Request (CSR) on the ASA.


You could just use the general keys for this but I'd make a specific key for each VPN. You then need a trustpoint where you can fine tune the certificate options. The enroll command will output the key to console.
!Generate the RSA key pair
crypto key generate rsa label FW1-Key modulus 1024

!Configure a trustpoint for the signed certificate
crypto ca trustpoint FW1-Key-trustpoint
enrollment terminal
fqdn 10.0.0.1
subject-name CN=10.0.0.1
keypair FW1-Key
crl configure

!output the CSR to console
crypto ca enroll FW1-Key-trustpoint


Copy this key into a text editor. It'll need the format changed slightly, by default the ASA outputs keys like:
MIIBnicE+P+jvc8JQBSbElTZUH8e7ULzXt8KWZQH6M/0U70wp6lqH6caHeCfDgKW
QIDAQABoDMwMQYJKoZIhbvHyAplT4ToJAATL7GwRhXqcmIpxL8k3xjP3XMkzorMZ
mLZdV8X4byX7Z9MlIEU44iWF+nePEJc60RQRgqTiLPqZcyO8besQxh74FVLW5H40
FE1/FceBzgz4ImgXMcC+0DxrNNToS2wZQDoYo7uL5I6hc9KBiV8Ki0drPe7ZOu4G
Pwdq+Ah9axuXtDua8xPe6G1bRQ9dGCgE4NSeQPnSz380WNqv6TZNddZhERlTNDoX
lbDQG0v+k5zJpCktRYa+f18IvJJxY9pVlpD4WKvyRHdaQydtudPejObY9prIg3rU
Gn1aJyCv0mjgF/JH4wnbhXgNbxBk0J1alpIEupq6Xo=

---End - This line not part of the certificate request---

But you need to edit the key so it looks like this:
-----BEGIN CERTIFICATE REQUEST-----
MIIBnicE+P+jvc8JQBSbElTZUH8e7ULzXt8KWZQH6M/0U70wp6lqH6caHeCfDgKW
QIDAQABoDMwMQYJKoZIhbvHyAplT4ToJAATL7GwRhXqcmIpxL8k3xjP3XMkzorMZ
mLZdV8X4byX7Z9MlIEU44iWF+nePEJc60RQRgqTiLPqZcyO8besQxh74FVLW5H40
FE1/FceBzgz4ImgXMcC+0DxrNNToS2wZQDoYo7uL5I6hc9KBiV8Ki0drPe7ZOu4G
Pwdq+Ah9axuXtDua8xPe6G1bRQ9dGCgE4NSeQPnSz380WNqv6TZNddZhERlTNDoX
lbDQG0v+k5zJpCktRYa+f18IvJJxY9pVlpD4WKvyRHdaQydtudPejObY9prIg3rU
Gn1aJyCv0mjgF/JH4wnbhXgNbxBk0J1alpIEupq6Xo=
-----END CERTIFICATE REQUEST-----


3. Sign the CSR using the CA.


To sign the key, copy it onto the system you've installed OpenSSL as per the previous guide. Use the following command to sign the CSR, mine's saved in a text file as "FW1-req.txt":
openssl ca -in FW1-req.txt -out FW1-signed.txt


4. Install the signed certificate onto the ASA.


To copy this certificate back to the ASA, import it for the trustpoint created earlier:
crypto ca import FW1-Key-trustpoint certificate
* Paste in the edited key as per above *


5. Configure the VPN.


The authentication method is configured in the crypto map, this will appear as follows:

crypto map outside_map 1 match address outside_1_cryptomap
crypto map outside_map 1 set pfs group2
crypto map outside_map 1 set peer 10.0.0.2
crypto map outside_map 1 set transform-set ESP-AES-128-SHA
crypto map outside_map 1 set trustpoint FW1-Key-trustpoint
crypto map outside_map interface outside


The rest of the VPN configuration is the same as pre-shared keys. Congratulations, you've got a certificate based VPN! If it's not working then try with a PSK to verify that the VPN is configured correctly, if that doesn't work then welcome to the wonderful world of debugging VPNs.

Read more...

OpenSSL CA for VPN Certificates

The aim of this article is to provide some pointers to getting a certificate authority (CA) up and running with OpenSSL and provide a few handy commands for reference. This will be used in some future articles about certificate based VPNs.


To do certificate based VPNs you need a couple of things:
  • A Certificate Authority (CA) that your end devices trust.
  • Host certificates signed by the CA.

I'll use the manual signing procedure which is done in several steps:
  1. Install the CA public key on the end devices.
  2. Create a Certificate Signing Request (CSR) on each end device.
  3. Use the CA to sign the CSR.
  4. Install the signed certificate back onto the device.
  5. Configure the VPN to use that certificate for authentication.

I've used the Ubuntu docs project guide to setting up a CA, that can be found here.

Update - August 2012 - Because Ubuntu are redirecting that site to another page with a different domain name the SSL cert is being rejected by strict filtering systems, so I'm copy/pasting some of it here for reference. The following is taken from the link above:
Creating the Certificate Authority
First, create an initial working environment, for example within your home directory by issuing the following command from a terminal prompt:


cd && mkdir -p myCA/signedcerts && mkdir myCA/private && cd myCA
The above command will place you in a newly-created subdirectory of your home directory named myCA, and within this subdirectory, you should have two additional subdirectories named signedcerts and private.

Within this initial working environment, the significance of the subdirectories, and their contents is as follows:

~/myCA : contains CA certificate, certificates database, generated certificates, keys, and requests

~/myCA/signedcerts : contains copies of each signed certificate 

~/myCA/private : contains the private key

Next, create an initial certificate database in the ~/myCA subdirectory with the following command at a terminal prompt:

echo '01' > serial  && touch index.txt

Now create an initial caconfig.cnf file suitable for the creation of CA certificates. Using your favorite editor, edit the file ~/myCA/caconfig.cnf, and insert the following content into the file:

sudo nano ~/myCA/caconfig.cnf

# My sample caconfig.cnf file.
#
# Default configuration to use when one is not provided on the command line.
#
[ ca ]
default_ca      = local_ca
#
#
# Default location of directories and files needed to generate certificates.
#
[ local_ca ]
dir             = /home//myCA
certificate     = $dir/cacert.pem
database        = $dir/index.txt
new_certs_dir   = $dir/signedcerts
private_key     = $dir/private/cakey.pem
serial          = $dir/serial
#       
#
# Default expiration and encryption policies for certificates.
#
default_crl_days        = 365
default_days            = 1825
default_md              = md5
#       
policy          = local_ca_policy
x509_extensions = local_ca_extensions
#       
#
# Default policy to use when generating server certificates.  The following
# fields must be defined in the server certificate.
#
[ local_ca_policy ]
commonName              = supplied
stateOrProvinceName     = supplied
countryName             = supplied
emailAddress            = supplied
organizationName        = supplied
organizationalUnitName  = supplied
#       
#
# x509 extensions to use when generating server certificates.
#
[ local_ca_extensions ]
subjectAltName          = DNS:alt.tradeshowhell.com
basicConstraints        = CA:false
nsCertType              = server
#       
#
# The default root certificate generation policy.
#
[ req ]
default_bits    = 2048
default_keyfile = /home//myCA/private/cakey.pem
default_md      = md5
#       
prompt                  = no
distinguished_name      = root_ca_distinguished_name
x509_extensions         = root_ca_extensions
#
#
# Root Certificate Authority distinguished name.  Change these fields to match
# your local environment!
#
[ root_ca_distinguished_name ]
commonName              = MyOwn Root Certificate Authority
stateOrProvinceName     = NC
countryName             = US
emailAddress            = root@tradeshowhell.com
organizationName        = Trade Show Hell
organizationalUnitName  = IT Department
#       
[ root_ca_extensions ]
basicConstraints        = CA:true
 IMPORTANT: Make sure to adjust the obvious site-specific details in the file, such as the two instances of /home// under [ local_ca ] and [ req ]. Also change commonName, stateOrProvinceName countryName etc under [ root_ca_distinguished_name ] to personalize for your environment. For more information on the directives contained within this configuration file, use the man config command.

When you've edited the file to match your environment, save the file as ~/myCA/caconfig.cnf.

Next, you need to generate the Certificate Authority Root Certificate and Key, by issuing a few commands. First, do this:

export OPENSSL_CONF=~/myCA/caconfig.cnf
The previous command sets an environment variable, OPENSSL_CONF, which forces the openssl tool to look for a configuration file in an alternative location (in this case, ~/myCA/caconfig.cnf).

Now, generate the CA certificate and key with the following command:

openssl req -x509 -newkey rsa:2048 -out cacert.pem -outform PEM -days 1825
You should be prompted for a passphrase, and see output similar to this:


Generating a 2048 bit RSA private key
.................................+++
.................................................................................................+++
writing new private key to '/home/bshumate/myCA/private/cakey.pem'
Enter PEM pass phrase:
Verifying - Enter PEM pass phrase:
-----
Do not forget the passphrase used with the command above! You'll need it every time you want to generate and sign a new server or client certificate!

The above process will create a self-signed certificate using PEM format and RSA public/private key encryption. The certificate will be valid for 1825 days. The location, and purpose of the resultant files is as follows:

~/myCA/cacert.pem : CA public certificate

~/myCA/private/cakey.pem : CA private key

Optional Step
Strip the certificate from all its text to keep only the -CERTIFICATE- section to create a crt

openssl x509 -in cacert.pem -out cacert.crt
Creating a Self-Signed Server Certificate
Now that you have a Certificate Authority configured, you may use it to sign self-signed certificates. Prior to beginning the steps below, you may wish to encrypt the certificate's private key with a passphrase. The advantages of encrypting the key with a passphrase include protection of the certificate in the event it is stolen. 

The certificate cannot be used with SSL-enabled applications without entering the passphrase every time the SSL-enabled application is started. This condition, while being most secure, can present a problem: If the server must be started in an unattended manner as in the case of a computer restart, then no one will be available to enter the passphrase, and subsequently the server will not start. One way to eliminate this condition involves a trade-off in security: The key may be decrypted, to remove the passphrase necessity; thus SSL-enabled applications will start automatically, without a need for you to enter a passphrase.

To actually generate a self-signed certificate for use with an SSL application, follow this process:

Create the server configuration file, by editing ~/myCA/exampleserver.cnf with your favorite text editor. Add this example content:


#
# exampleserver.cnf
#

[ req ]
prompt                  = no
distinguished_name      = server_distinguished_name

[ server_distinguished_name ]
commonName              = tradeshowhell.com
stateOrProvinceName     = NC
countryName             = US
emailAddress            = root@tradeshowhell.com
organizationName        = My Organization Name
organizationalUnitName  = Subunit of My Large Organization
Be sure to change the values under server_distinguished_name especially the commonName value. The commonName value must match the host name, or CNAME for the host you wish to use the key for. If the commonName does not match the intended hostname, then host / certificate mismatch errors will appear in the client applications of clients attempting to access the server.

Once you've edited the file appropriately, save it as ~/myCA/exampleserver.cnf. Generate the server certificate, and key with the following commands:

export OPENSSL_CONF=~/myCA/exampleserver.cnf

The previous command sets an environment variable OPENSSL_CONF which forces the openssl tool to look for a configuration file in an alternative location (in this case, ~/myCA/exampleserver.cnf).

Now generate the certificate, and key:

openssl req -newkey rsa:1024 -keyout tempkey.pem -keyform PEM -out tempreq.pem -outform PEM

You should be prompted for a passphrase, and see output similar to this:


Generating a 1024 bit RSA private key
...++++++
...............++++++
writing new private key to 'tempkey.pem'
Enter PEM pass phrase:
Verifying - Enter PEM pass phrase:
-----
Don't forget the passphrase!

Next, you may translate the temporary private key into an unencrypted key by using the following command:

openssl rsa < tempkey.pem > server_key.pem

You should be prompted for the passphrase used above, and see the following output:


Enter pass phrase:
writing RSA key
If you wish to leave the key encrypted with a passphrase, simply rename the temporary key using the following command, instead of following the step above:

mv tempkey.pem server_key.pem

 Remember: If you use a server key encrypted with a passphrase, the passphrase will have to be entered each time the server application using the encrypted key is started. This means the server application will not start unless someone, or something enters the key.

Now you need to sign the server certificate with the Certificate Authority (CA) key using these commands:

export OPENSSL_CONF=~/myCA/caconfig.cnf

The previous command modifies the environment variable OPENSSL_CONF which forces the openssl tool to look for a configuration file in an alternative location (in this case, ~/myCA/caconfig.cnf to switch back to the CA configuration).

Then sign the certificate as follows:

openssl ca -in tempreq.pem -out server_crt.pem

You will be prompted for the passphrase of the CA key as created in the Certificate Authority setup from above. Enter this passphrase at the prompt, and you will then be prompted to confirm the information in the exampleserver.cnf, and finally asked to confirm signing the certificate. Output should be similar to this:


Using configuration from /home/bshumate/myCA/caconfig.cnf
Enter pass phrase for /home/bshumate/myCA/private/cakey.pem:
Check that the request matches the signature
Signature ok
The Subject's Distinguished Name is as follows
commonName            :PRINTABLE:'tradeshowhell.com'
stateOrProvinceName   :PRINTABLE:'NC'
countryName           :PRINTABLE:'US'
emailAddress          :IA5STRING:'root@tradeshowhell.com'
organizationName      :PRINTABLE:'Trade Show Hell'
organizationalUnitName:PRINTABLE:'Black Ops'
Certificate is to be certified until Jan  4 21:50:08 2011 GMT (1825 days)
Sign the certificate? [y/n]:y


1 out of 1 certificate requests certified, commit? [y/n]y
Write out database with 1 new entries
Data Base Updated
Remove the temporary certificate, and key files with the following command:

rm -f tempkey.pem && rm -f tempreq.pem

Congratulations! You now have a self-signed server application certificate, and key pair:

server_crt.pem : Server application certificate file

server_key.pem : Server application key file

END OF COPY/PASTE

The instructions should work for any Unix system with OpenSSL.

The only changes I've made to their configuration were the hostname/path/DN changes and to alter policy about which fields needed to be supplied in the CSRs. This is just to save filling out every field each time I want to change certificates in the lab.


[ local_ca_policy ]
commonName = supplied
stateOrProvinceName = optional
countryName = optional
emailAddress = optional
organizationName = optional
organizationalUnitName = optional


With your directory structure created as per that article, config file created and appropriate environmental variables set you have a functional CA.

Handy OpenSSL Commands


Generate the CA public and private keys:

openssl req -x509 -newkey rsa:1024 -out cacert.pem -outform PEM -days 1825

Show information on a certificate:

openssl x509 -text -in <CERT>

Show information in a CSR:

openssl req -text -noout -in <CSR>

Verify the signature of a CSR:

openssl req -text -noout -in <CSR> -verify

Sign a CSR:

openssl ca -in <CSR> -out <SIGNED-CERT>


Read more...

Monday, 22 June 2009

SNMPv3

Quick article on SNMP version 3, focused on Cisco kit.

Previous versions of SNMP were configured using community strings and single-line commands in IOS.

SNMPv3 management is more like user/account management and the configuration does not appear in "show run" but is instead hidden in the private config. You access SNMPv3 configuration information via "show snmp x" commands.

SNMPv3 Communication.

There are three ways to configure SNMPv3 communication:
NoAuthNoPriv (called noauth in IOS) – username only authentication, packet sent cleartext.
AuthNoPriv (called auth in IOS) – HMAC authentication (SHA or MD5), packet sent cleartext.
AuthPriv (called priv in IOS) – HMAC authentication, encrypt entire packet.


SNMPv3 Groups.

Groups are configured as follows:
snmp-server group <groupname> v3 noauth|auth|priv [access X]


(access X is an ACL restricting hosts where accounts in the group can be accessed from).


SNMPv3 Users.

SNMP Users are configured as follows:
snmp-server user <user> <group> v3 auth <sha|md5> <pass> priv des <privpass> [access x]

Note: The password should be at least 8 letters long according to the RFC.


SNMPv3 Views.

These are used to control which MIBS the users can browse or which traps are allowed to be sent. There are three types:

Read views – Values you can look at by SNMP polling the device.
Write views – Values you can set via SNMP polling.
Notify views – Values that can be sent as SNMP traps.

I don't specifically use groups so the default settings are:

If you create a new group then it is given the read view "v1default".

If you create an SNMP trap configuration then the group associated with it has a notify view automatically generated by IOS. These views have names beginning with *tv.FFF


I've written a brief dit on getting older versions of CiscoWorks to support SNMPv3 here

Read more...

Monday, 8 June 2009

Checkpoint to Cisco VPNs #2

This is part 2 of the article started here. I'll be creating traditional mode VPN rules, because they are less abstracted than VPN communities and a bit easier to understand (in my opinion). There are some complications*.

To follow a similar methodology to that used on the Cisco router, the steps are as follows:
  1. Define the ISAKMP (phase 1) policy.
  2. Define the IPsec (phase 2) policy.
  3. Create the firewall rule specifying traffic to pass over the VPN.
  4. Define the encryption domains.

Checkpoint doesn't really have a concept of applying the crypto map to an interface as with Cisco. The Cisco concept of a crypto map is close to the encryption domains on Checkpoint.


1. Define the ISAKMP (phase 1) policy.

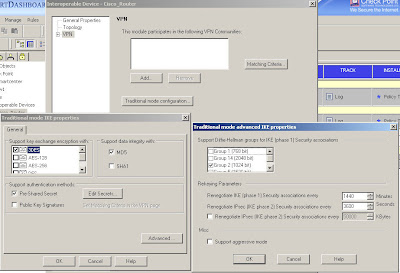
In Checkpoint the ISAKMP configuration is applied to an "interoperable device" object created for the Cisco VPN gateway. Edit your interoperable device and select "traditional mode configuration" on the "VPN" page to open the ISAKMP properties as shown here:

You configure encryption and integrity, specify to use a pre-shared secret (although you won't be able to enter one just yet) and in the "Advanced" options you can specify DH and lifetimes.

Be careful as the Cisco and Checkpoint default lifetimes do not match.

In practice, ISAKMP can negotiate new keys when the old ones are due to expire but best to make them match anyway to keep things tidy.


2. Define the IPsec (phase 2) policy.
3. Create the firewall rule specifying traffic to pass over the VPN.

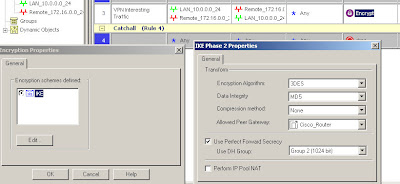
IPSec policy is defined under the actual firewall rule which also specifies the interesting traffic. Create a rule allowing the VPN traffic through the firewall (using pre-NAT addresses) and set the action to be "Encrypt"*. Double click on "Encrypt" and you can edit the IPSec settings for the connection.

In this case we're using 3DES/MD5, DH group 2 and specifying which interoperable device the VPN is talking to.

The traffic being allowed is between 10.0.0.0/24 (local) and 172.16.0.0/24 (remote) in either direction and Any protocol.


4. Define the encryption domains.

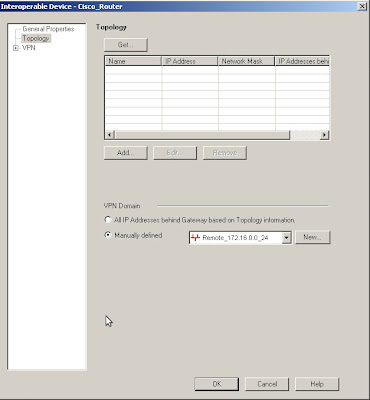
The encryption domains on Checkpoint are defined as properties of the gateway objects. Edit the interoperable device and open the "Toplogy" page, you can either manually set the topology or use another object to represent the encryption domain.

Here I am using the Remote_172.16.0.0_24 network object to define the Cisco end of the VPN encryption domain.

If you do destination NAT then the encryption domain is the post-NAT address as opposed to the firewall rules which must contain the pre-NAT address.


So that's the remote encryption domain defined, the local encryption domain is specified in the Checkpoint gateway object in the same way. The best way to do this is with a group, so that you can easily add further subnets in future if needed.


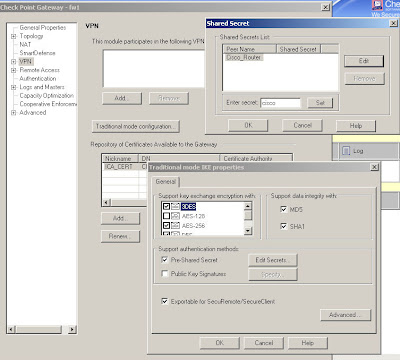
There is just one thing missing from the above, the shared key. This is actually defined on your local Checkpoint object rather than the remote peer's object. The reason I put this last is that the peer name won't show up until you've configured the interoperable device properties.

Edit your own Checkpoint enforcement module and open the VPN "Traditional mode configuration", then use the "Edit Secrets" button and you should see an entry for each of your VPN peers that have the "Pre-Shared Secret" box ticked.

Simply select the peer and enter the secret, "cisco" in this case.


Now having said all of the above, I will also say that making these systems interact nicely is a tricky business and you may find that it doesn't work even if you've followed these instructions to the letter.

Part 3 of this series of articles will include some troubleshooting methods to try and help fix any problems.


* Note: Checkpoint firewall policies are either in traditional VPN mode or simplified VPN mode which uses communities rather than the rules shown above.

If you don't have the "Encrypt" option in the Action column or if you have a "VPN" column then you're using a simplified VPN policy and cannot create traditional mode VPNs. Unfortunately you cannot convert a policy from simplified mode to traditional so your options are either to create a new policy from scratch, specifying "traditional" when you create it, or to use VPN communities instead.

Read more...

Tuesday, 19 May 2009

Secure Switchport Template

There are several reasons why you might want to use a switch port template.
  • Make life easier for administrators.
  • Standardize configuration.
  • Allow people without specific Cisco knowledge to configure ports.
  • Increase security.

An example template in macro form:


macro name accessport
switchport mode access
switchport nonegotiate
switchport access vlan 99
no cdp enable
spanning-tree portfast
spanning-tree bpduguard enable
storm-control multicast level 20.00
storm-control broadcast level 20.00
@


To apply this to a port run:

configure terminal
interface fa0/xx
macro apply accessport


It is probably advisable to reset the port configuration in advance in which case the commands become:

configure terminal
default interface fa0/xx
interface fa0/xx
macro apply accessport


So what do these commands do?

switchport mode access
Specify the port is an access port.
switchport nonegotiate
Disable Dynamic Trunking Protocol (DTP).
switchport access vlan 99
Set the port into a VLAN to avoid VLAN hopping shenanigens. Replace VLAN 99 with the ID of an unused VLAN on your network (not VLAN 1!).
no cdp enable
Disable CDP to stop attackers flooding the CDP neighbor table using Yersinia or similar tools.
spanning-tree portfast
Turn on portfast for access ports, usually a good idea. If you use boot-from-LAN then you'll need this!
Note that turning on portfast does NOT disable STP on that port, it just allows the port to go directly to the forwarding state. You could still create a temporary bridging loop however so also apply:
spanning-tree bpduguard enable


Turn on BPDU Guard to shut the port down if it gets connected to another switch, but allow this switch to keep sending BPDUs on that port.

You can turn this on globally with the command:
spanning-tree portfast bpduguard default


storm-control multicast level 20.00
storm-control broadcast level 20.00

Configure storm-control.


Further reading:

The NSA guide to Cisco switch security.

Read more...