To follow a similar methodology to that used on the Cisco router, the steps are as follows:
- Define the ISAKMP (phase 1) policy.
- Define the IPsec (phase 2) policy.
- Create the firewall rule specifying traffic to pass over the VPN.
- Define the encryption domains.
Checkpoint doesn't really have a concept of applying the crypto map to an interface as with Cisco. The Cisco concept of a crypto map is close to the encryption domains on Checkpoint.
1. Define the ISAKMP (phase 1) policy.
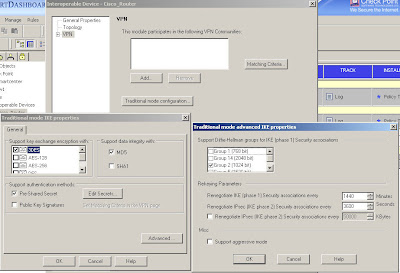
In Checkpoint the ISAKMP configuration is applied to an "interoperable device" object created for the Cisco VPN gateway. Edit your interoperable device and select "traditional mode configuration" on the "VPN" page to open the ISAKMP properties as shown here:
 You configure encryption and integrity, specify to use a pre-shared secret (although you won't be able to enter one just yet) and in the "Advanced" options you can specify DH and lifetimes.
Be careful as the Cisco and Checkpoint default lifetimes do not match.
In practice, ISAKMP can negotiate new keys when the old ones are due to expire but best to make them match anyway to keep things tidy.
2. Define the IPsec (phase 2) policy.
3. Create the firewall rule specifying traffic to pass over the VPN.
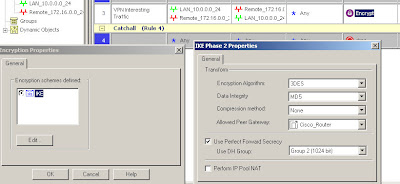
IPSec policy is defined under the actual firewall rule which also specifies the interesting traffic. Create a rule allowing the VPN traffic through the firewall (using pre-NAT addresses) and set the action to be "Encrypt"*. Double click on "Encrypt" and you can edit the IPSec settings for the connection.
 In this case we're using 3DES/MD5, DH group 2 and specifying which interoperable device the VPN is talking to.
The traffic being allowed is between 10.0.0.0/24 (local) and 172.16.0.0/24 (remote) in either direction and Any protocol.
4. Define the encryption domains.
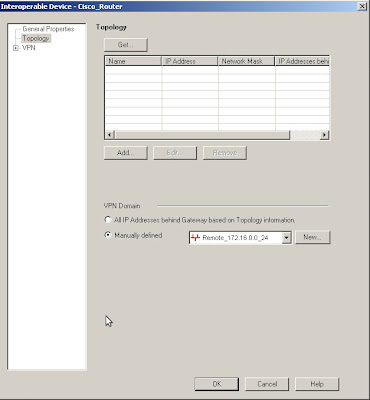
 The encryption domains on Checkpoint are defined as properties of the gateway objects. Edit the interoperable device and open the "Toplogy" page, you can either manually set the topology or use another object to represent the encryption domain.
Here I am using the Remote_172.16.0.0_24 network object to define the Cisco end of the VPN encryption domain.
If you do destination NAT then the encryption domain is the post-NAT address as opposed to the firewall rules which must contain the pre-NAT address.
So that's the remote encryption domain defined, the local encryption domain is specified in the Checkpoint gateway object in the same way. The best way to do this is with a group, so that you can easily add further subnets in future if needed.
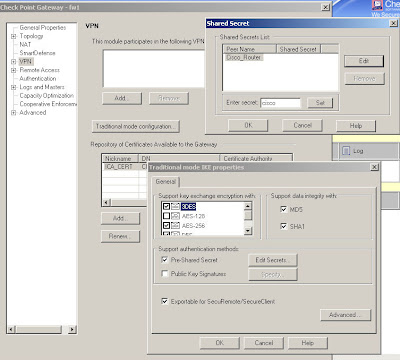
There is just one thing missing from the above, the shared key. This is actually defined on your local Checkpoint object rather than the remote peer's object. The reason I put this last is that the peer name won't show up until you've configured the interoperable device properties.
 Edit your own Checkpoint enforcement module and open the VPN "Traditional mode configuration", then use the "Edit Secrets" button and you should see an entry for each of your VPN peers that have the "Pre-Shared Secret" box ticked.
Simply select the peer and enter the secret, "cisco" in this case.
Now having said all of the above, I will also say that making these systems interact nicely is a tricky business and you may find that it doesn't work even if you've followed these instructions to the letter.
Part 3 of this series of articles will include some troubleshooting methods to try and help fix any problems.
* Note: Checkpoint firewall policies are either in traditional VPN mode or simplified VPN mode which uses communities rather than the rules shown above.
If you don't have the "Encrypt" option in the Action column or if you have a "VPN" column then you're using a simplified VPN policy and cannot create traditional mode VPNs. Unfortunately you cannot convert a policy from simplified mode to traditional so your options are either to create a new policy from scratch, specifying "traditional" when you create it, or to use VPN communities instead.


